Ultralytics YOLO Foundations: Part 1

Tasks & Inference

2026-03-13

1. First Steps: What can YOLO do?

Start using AI immediately without training!

The YOLO CLI Structure

Interacting with Ultralytics is simple:

yolo TASK MODE ARGS

  • TASK: What to solve? (detect, segment, classify, pose, obb)
  • MODE: What ML stage? (predict, train, val, export, track, benchmark)
  • ARGS: Settings like model=yolo26n.pt or source="image.jpg"

Predefined Classes & Weights

Models pre-trained on the COCO dataset recognize 80 common classes right out of the box. Using .pt models means we utilize these pre-learned weights without training!

Model Naming Convention (e.g., yolo26n-seg.pt, yolo11x-cls.pt):

  • Family: e.g., yolo26, yolo11
  • Size: n (Nano, fastest) up to x (Extra Large, most accurate)
  • Task: default is detection. -seg (Segmentation), -cls (Classification), -pose (Pose Estimation)

2. Exploring Tasks (Live!)

Let’s see the tasks in action using the predict mode.

Image Classification Output Concept

Model Output (Probabilities):

  • top1 (0): The most likely class ID.
  • top1conf (0.95): Confidence score of the top class.
  • probs: Array of probabilities for all possible classes.

Multi-Label Classification Since probs evaluates every class, we can predict multiple labels for a single image by applying a confidence threshold (e.g., keeping all classes with prob > 0.50) instead of just taking the top1 prediction.

Image Classification in Action

Identify what the entire image contains.

yolo task=classify mode=predict model=yolo26n-cls.pt source="https://ultralytics.com/images/bus.jpg"
# Python Equivalent
from ultralytics import YOLO

model = YOLO("yolo26n-cls.pt")
results = model.predict(source="https://ultralytics.com/images/bus.jpg")

# Access Output Format
probs = results[0].probs
print(f"Top-1 Class: {probs.top1}")          # Index of the most likely class
print(f"Top-1 Confidence: {probs.top1conf}") # Confidence score
print(f"All Probabilities: {probs.data}")    # Tensor of all class probabilities

Docs Reference: Classification

Object Detection Output & Confidence
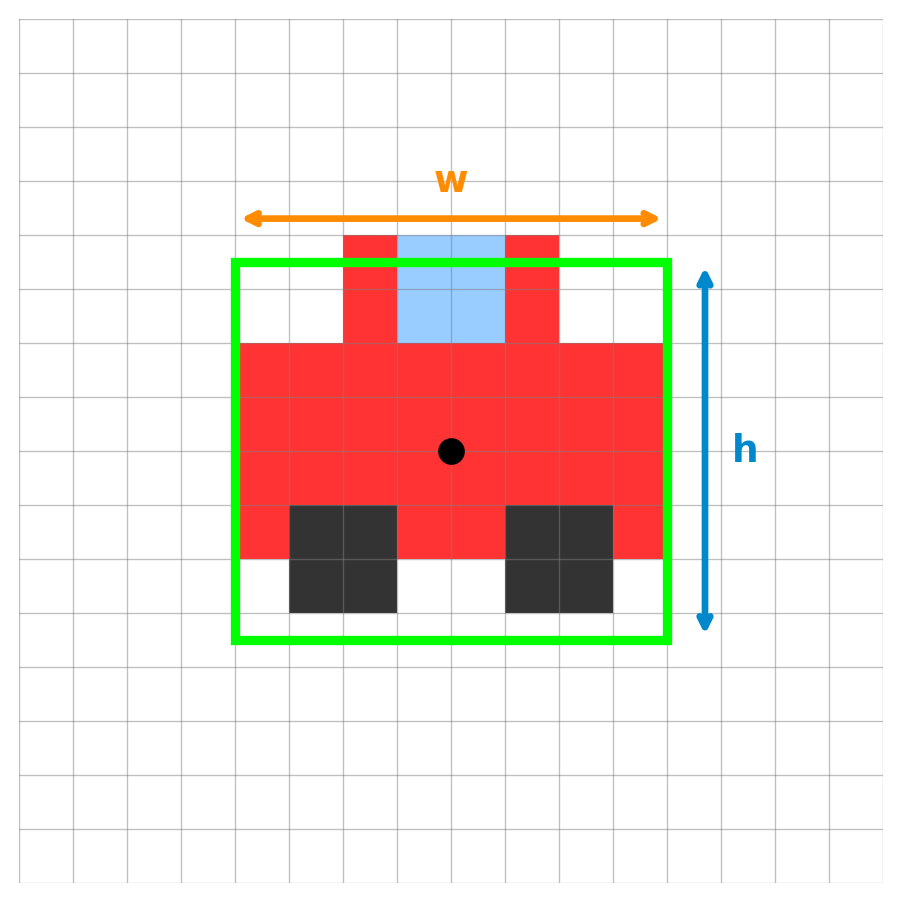
Model Output:

  • cx, cy (7.5, 7.5): The center coordinates.
  • w (8.0) & h (7.0): The box width and height.
  • conf (0.85): The confidence score.
  • cls (0): The class ID.

Filtering Predictions We use a Confidence Threshold to automatically drop weak predictions (e.g., ignoring any box with conf < 0.50).

Mapping to Bounding Boxes

Mapping to \((x_{min}, y_{min}, x_{max}, y_{max})\):

\[ \begin{align*} x_{min} &= cx - \frac{w}{2} = 7.5 - 4.0 = 3.5 \\ y_{min} &= cy - \frac{h}{2} = 7.5 - 3.5 = 4.0 \\ x_{max} &= cx + \frac{w}{2} = 7.5 + 4.0 = 11.5 \\ y_{max} &= cy + \frac{h}{2} = 7.5 + 3.5 = 11.0 \end{align*} \]

The Concept of N Objects

Rarely does an image contain exactly one object!

  • YOLO evaluates the image and can predict multiple bounding boxes at once.
  • The single 6-element array [cx, cy, w, h, conf, cls] is stacked \(N\) times.
  • Resulting Output Shape: \((N, 6)\) (where \(N\) is the number of detected objects).

Wait, how does it know the class? Behind the scenes, each of those \(N\) bounding boxes also predicted probabilities for ALL 80 classes, just like Image Classification! The final cls ID shown in the output is simply the class that scored the highest probability for that specific box.

Object Detection in Action

Find and localize objects using bounding boxes.

# Live Example: Try this in your terminal!
yolo task=detect mode=predict model=yolo26n.pt source="https://ultralytics.com/images/bus.jpg"
# Python Equivalent
from ultralytics import YOLO

model = YOLO("yolo26n.pt")
results = model.predict(source="https://ultralytics.com/images/bus.jpg")

# Access Output Shape and Data
boxes = results[0].boxes
print(f"Boxes shape: {boxes.shape}")  # (N, 6) -> N boxes: x1, y1, x2, y2, conf, cls

Docs Reference: Detection

The Problem with Absolute Pixels

Why not just train the model on absolute pixel values like w = 8.0?

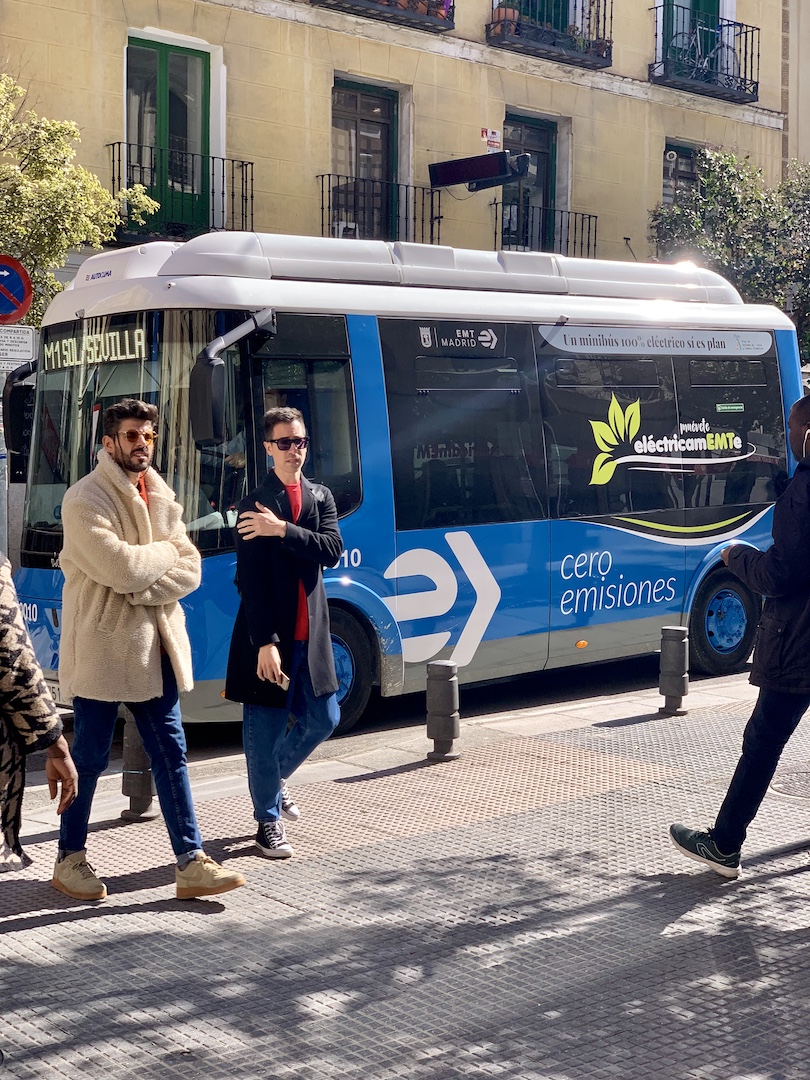
  • Images come in all shapes and sizes (4K, 1080p, square, portrait).
  • A car that is 800 pixels wide in a 4K image might only be 200 pixels wide in a 1080p image.
  • If the model learns “cars are 800 pixels wide”, it will fail on smaller images!

The Solution: Normalized Coordinates

Instead of pixels, we teach the model using fractions of the image size (0.0 to 1.0).

  • \(cx_{norm} = cx_{pixel} / image\_width\)
  • \(w_{norm} = w_{pixel} / image\_width\)

A car that takes up half the image width is always \(w = 0.5\), regardless of whether the image is 4K or 1080p!

Training vs. Predicting You MUST provide normalized coordinates (0.0 to 1.0) when training the model. However, when you use model.predict(), the Ultralytics Python API conveniently un-normalizes them back into standard absolute pixels (like boxes.xyxy) for immediate use!

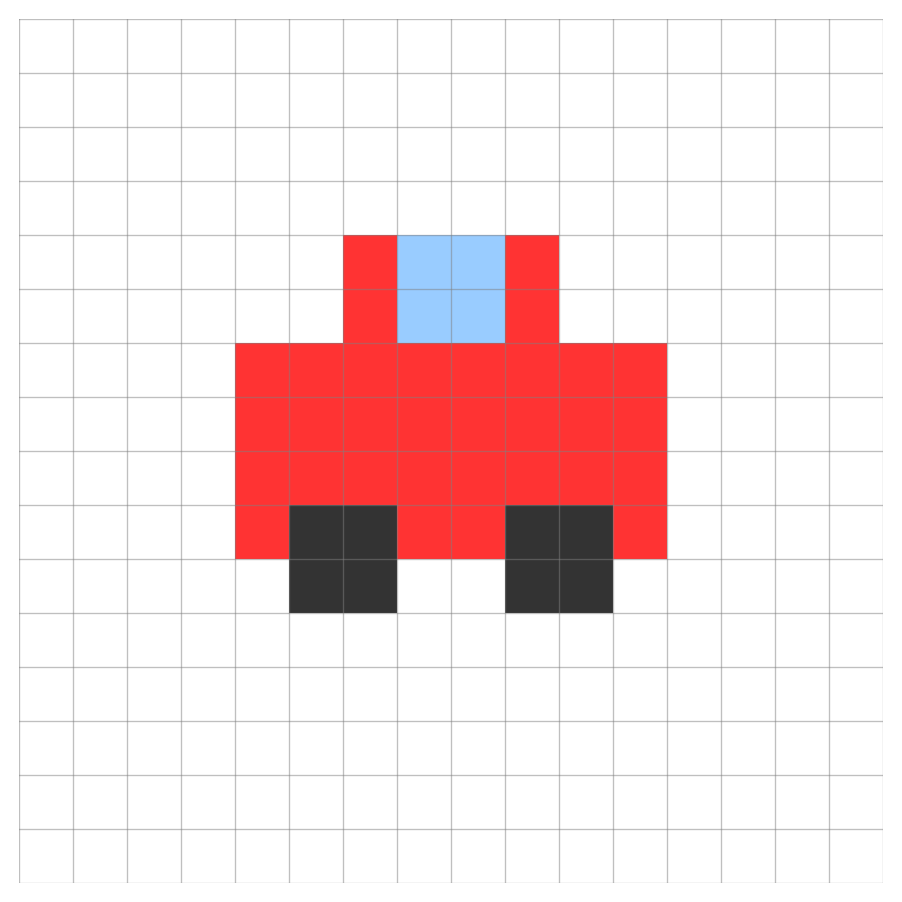
Instance Segmentation Output Concept

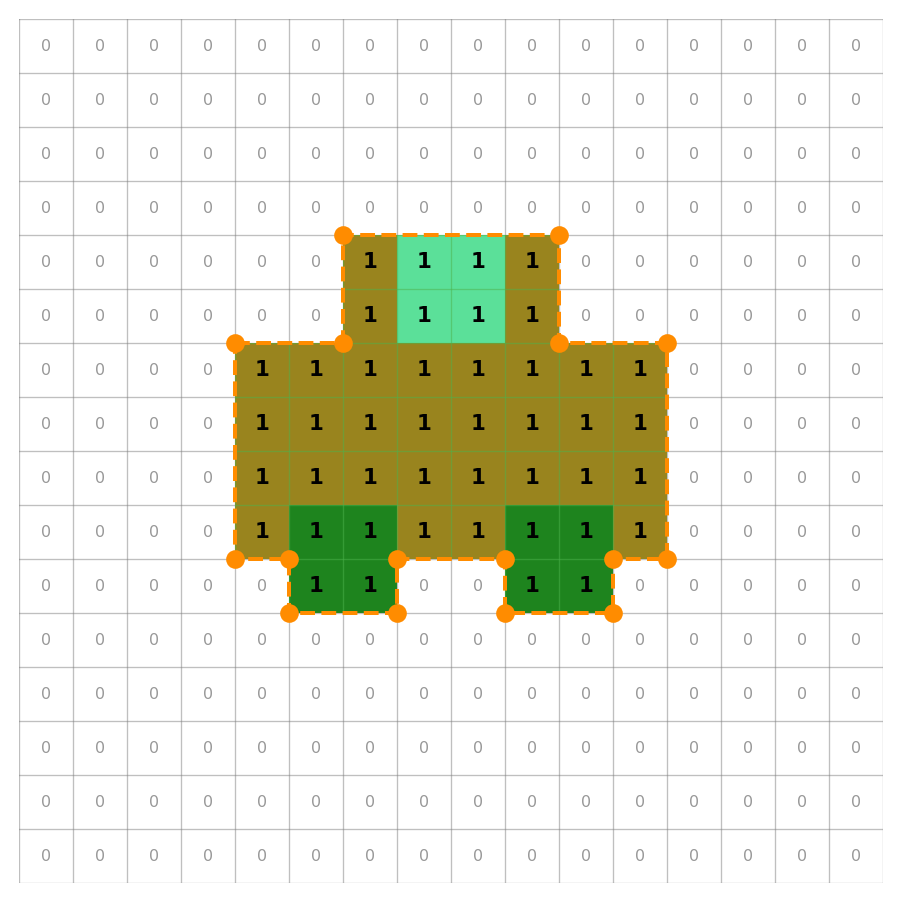
Model Output (Mask / Polygon):

  • Mask Tensor: A 2D array (bitmap) of pixels indicating the object’s exact shape (1 = object, 0 = background).
  • Coordinates: Sequence of \((x, y)\) polygon coordinates derived from the mask.
  • conf (0.89): Confidence score.
  • cls (0): Class ID.

Instance Segmentation in Action

Outline the exact shape (pixels) of each object instance.

# Live Example: See the masks!
yolo task=segment mode=predict model=yolo26n-seg.pt source="https://ultralytics.com/images/bus.jpg"
# Python Equivalent
from ultralytics import YOLO

model = YOLO("yolo26n-seg.pt")
results = model.predict(source="https://ultralytics.com/images/bus.jpg")

# Access Output Shape and Data
masks = results[0].masks
print(f"Masks shape: {masks.data.shape}")  # (N, H, W) -> N masks of HxW size
print(masks.xy)                            # Polygon coordinates

Docs Reference: Segmentation

Pose Estimation Output Concept

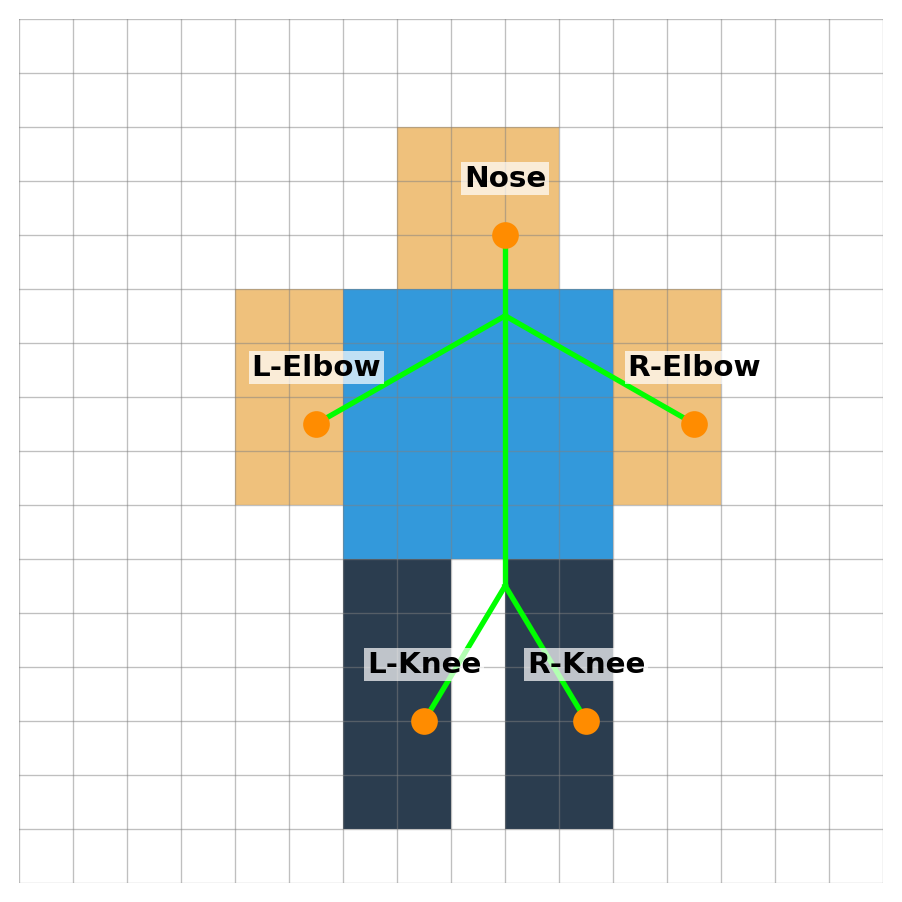
Model Output (Keypoints):

  • x, y: Coordinate pair for each predefined keypoint.
  • visibility: Whether the keypoint is visible (i.e., not occluded).
  • kp_conf (per keypoint): Confidence score for each keypoint’s location.
  • conf (0.92): Overall person detection confidence score.
  • cls (0): Class ID (always 0 = person for pose models).

Pose Estimation in Action

Estimate human body keypoints (elbows, knees).

# Live Example: Track keypoints!
yolo task=pose mode=predict model=yolo26n-pose.pt source="https://ultralytics.com/images/bus.jpg"
# Python Equivalent
from ultralytics import YOLO

model = YOLO("yolo26n-pose.pt")
results = model.predict(source="https://ultralytics.com/images/bus.jpg")

# Access Output Shape and Data
keypoints = results[0].keypoints
print(f"Keypoints shape: {keypoints.data.shape}")  # (N, 17, 3) -> N persons, 17 keypoints, (x, y, conf)
print(keypoints.xy)                                # Keypoint coordinates

Docs Reference: Pose

OBB (Oriented Bounding Box) Output Concept

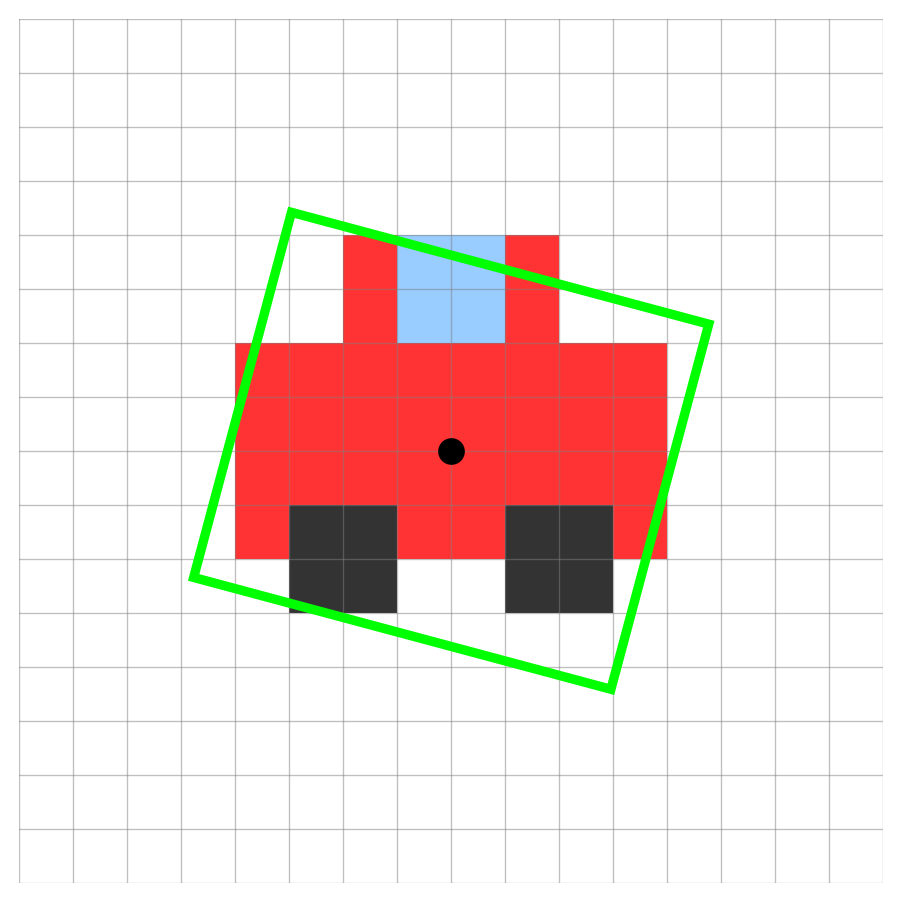
Model Output (Oriented Box):

  • cx, cy: The center coordinates.
  • w & h: The box width and height.
  • angle: The rotation angle of the box.
  • conf: The confidence score.
  • cls: The class ID.

OBB in Action

Detect objects with oriented bounding boxes (useful for aerial/satellite imagery or rotated objects).

yolo task=obb mode=predict model=yolo11n-obb.pt source="https://ultralytics.com/images/bus.jpg"
from ultralytics import YOLO

model = YOLO("yolo11n-obb.pt")
results = model.predict(source="https://ultralytics.com/images/bus.jpg")

# Access Output Shape and Data
obb = results[0].obb
print(f"OBB shape: {obb.data.shape}")  # (N, 7) -> N boxes: cx, cy, w, h, angle, conf, cls
print(obb.xywhr)                       # Center x, y, width, height, rotation angle

Docs Reference: OBB

Object Tracking in Action

Assign distinct IDs to objects and track them continuously across video frames!

yolo task=detect mode=track model=yolo26n.pt source="path/to/video.mp4"
from ultralytics import YOLO

model = YOLO("yolo26n.pt")
# Use track() with stream=True for memory-efficient video processing
results = model.track(source="path/to/video.mp4", stream=True)

# Iterate through the video frames
for result in results:
    boxes = result.boxes
    if boxes.id is not None:
        # Extract IDs as a list of integers
        ids = boxes.id.int().tolist()
        print(f"Tracking IDs: {ids}")  # e.g., [1, 2]

Docs Reference: Tracking

Predict Usage (Python): Batch Input

Process multiple sources or directories efficiently!

from ultralytics import YOLO

# Load your model
model = YOLO("yolo26n.pt")

# Option 1: A list of specific sources
sources = [
    "https://ultralytics.com/images/bus.jpg",
    "path/to/local/image.jpg",
    "another_image.png"
]
results = model.predict(source=sources)

# Option 2: An entire directory
# results = model.predict(source="path/to/my_images_folder/")

Predict Usage (Python): Processing Results

Process the batch results or use a memory-efficient stream.

# Process the batch results
for result in results:
    boxes = result.boxes  # Bounding boxes
    probs = result.probs  # Classification probabilities
    result.show()         # Display each result
    result.save(filename=f"result_{result.path.name}")

Stream/Generator: For very large datasets, you can use stream=True in the predict call:

model.predict(source="dir/", stream=True)

Conclusion

Wrapping Up Day 1

Summary

  • YOLO Basics: We explored how to use the CLI and Python API for various tasks.
  • Tasks: Object Detection, Image Classification, Instance Segmentation, Pose Estimation, and OBB.
  • Coordinates: The importance of normalized coordinates over absolute pixels.
  • Inference: How to predict on single images, videos, and batches efficiently.

Next Steps

Next up: Real World Use Cases & Solutions

  • Learn how to extract actionable insights from trained models.
  • Discover out-of-the-box solutions for real-world problems.
  • Integrate object tracking, counting, and more into your applications.

Q&A

Thank You!

Any questions?